Transitions
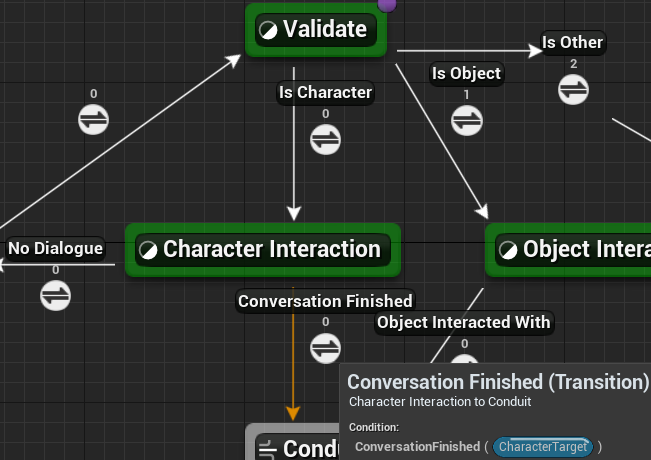
Transitions are automatically created when connecting two states. They consist of a single boolean condition and are sorted based on priority with the lowest number evaluating first. Once a transition is taken the previous state will exit and transition evaluation will stop.
Transitions that are evaluating are visualized with an animation while debugging.
Video
Evaluation
When the first transition out of an active state evaluates to true, the state exits, the transition is taken, and the destination state becomes active.
Can Enter Transition
The primary condition logic of a transition. This must consist of pure blueprint functions and evaluate to true or false.
Optional Nodes
Optional nodes can be added by right clicking on the transition graph and searching for the node you want to add.
On Transition Entered
An optional node which will only execute if this transition has evaluated to true and is being taken to the next state.
Function Execution
It is possible to execute functions from this event, making this a good choice if you need to execute logic when a transition is taken.
On Transition Initialized
When the state leading to the transition is entered. Most commonly used for setting up manual event binding.
Look for On Node Initialized
Appears as On Node Initialized in the context menu.
On Transition Shutdown
When the state leading to the transition is exited. Most commonly used for cleaning up manual event binding.
Look for On Node Shutdown
Appears as On Node Shutdown in the context menu.
On Transition Pre-Evaluate
Called before each evaluation.
Performance Warning
On Transition Initialized should be used instead. If the transition evaluates on tick then this will be called frequently.
On Transition Post-Evaluate
Called after each evaluation.
Performance Warning
On Transition Shutdown should be used instead. If the transition evaluates on tick then this will be called frequently.
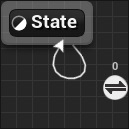
Self Transitions
It is possible to have a state link to itself. Right click on the state and choose Link to Self. This transition will evaluate like any other transition and the state will call its On State End logic and then call its On State Begin logic.
Accessing Node Instance and Variables
Transition Instance
Call Get Node Instance in the local graph to get access to the transition instance. This call is equivalent to a self reference in a custom transition class.
Previous and Next State Instances
From the transition instance you can call Get Previous State Instance or Get Next State Instance and cast the result to the correct state class to retrieve variables from those states.
Event Based Transitions
Logic Driver supports binding transitions to events. This can be a much more peformant solution than evaluating a transition each tick.
There are two main ways to bind to events. One is an automatic solution where you select the event from a drop down. The other is a manual solution that gives you more control and can work with custom node classes.
Conduits
When using conduits events should only be used from the first transition before the initial conduit. Conduits should be considered part of the initial transition, and won't work correctly with events that occur after the initial evaluation.
Automatic Event Binding
You can automatically bind to event delegates either directly on the state machine instance or from the context. In Pro you can also bind to the previous state's delegates. No other locations are supported for auto-binding.
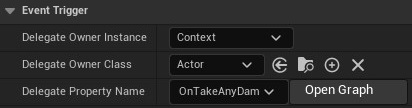
- From the transition's details panel select the
Delegate Owner Instanceyour event is located at. This can beThis,Context,orPrevious State(Pro only). - If
Delegate Owner Instanceis set toContext, then provide the class your context uses underDelegate Owner Class, otherwise skip to the next step. -
Under
Delegate Property Nameselect the delegate name. This list is automatically populated based on the steps above.
This creates an event node named after your delegate connected to a new Event Trigger Result Node in the local graph.
Automatic event triggers rely on Can Enter Transition of the Event Trigger Result Node and ignore the primary Can Enter Transition conditional result.
Delegate Owner Instance
When Delegate Owner Instance is set to This delegates from the current state machine are used.

To add a new delegate just do so as you would normally by adding a new Event Dispatcher to your state machine class.

When set to Context you must specify the class since that information isn't known until run-time. This populates available delegates.
To add a new delegate just do so as you would normally by adding a new Event Dispatcher to your context class.
When set to Previous State the previous state class will automatically be determined and available delegates populated.
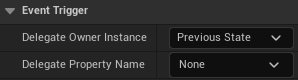
Do not use the default state delegates such as OnStateBeginEvent. These events are meant for observers that do not trigger state changes. Only custom delegates should be used.
To add a new delegate just do so as you would normally by adding a new Event Dispatcher to your state class.
- Auto-binding events will automatically update the state machine when the event evaluates.
- It is possible to turn off conditional (tick) evaluation with this approach.
- Automatic event binding can only be done on transition local graphs, not on USMTransitionInstance classes. For event binding in transition classes use Manual Event Binding.
Component Events
There is no way to auto-bind to the owning state machine component's events. For this case manual binding is required, but is not recommended as it creates a circular dependency between the state machine instance and the state machine component.
Manual Event Binding
Using optional nodes it is possible to bind to events located anywhere. The best practice is to bind to the events when transitions initialize, and cleanup the event when transitions shutdown. Then have the event trigger transition evaluation.
When using this approach conditional evaluation is still required, but the transition graph will only evaluate when the event fires. (1)
-
Manual events rely on the primary Can Enter Transition conditional result.
-
The Initialize node should be used to bind to events.
- The Shutdown node should be used to unbind from events.
-
On the transition default properties, uncheck
Can Evaluate Conditionally.Can Evaluate Conditionally
Unchecking
Can Evaluate Conditionallyprevents the transition from evaluating its Can Enter Transition conditional result until we tell it to. This means even if the result istruethe transition won't be taken. -
Set
Can Enter Transitionunder the conditional result totrue. -
Call Evaluate From Manually Bound Event from the event. This is an optimized call which will only evaluate (and possibly take) this specific transition. If calling from a local graph you will need to call Get Node Instance first.
Utilize Fast Path
It's better to place any needed conditional logic prior to calling
Evaluate from Manually Bound Eventand leavingConditional Resultto true. This way an evaluation is only triggered when you know it will succeed, and becauseCan Enter Transitionis true it triggers fast path evaluation.

This approach isn't as efficient, generally requires tick, and doesn't work as well with conduits.
- After binding to your event, change
Set Can Evaluate Conditionallyto false. - Set
Can Enter Transitionunder the conditional result totrue. - From your event, change
Set Can Evaluate Conditionallyback to true.
Set Can Evaluate Conditionally
When used from a transition instance, Set Can Evaluate Conditionally is displayed as Set Can Evaluate.

Properties
Clicking on a transition will let you configure any properties of that transition.
Priority Order
Lower numbers take priority. They are sorted once on State Machine initialization and evaluated in that order. Once a transition evaluates to true processing will stop and that transition will be taken.
This number is also displayed above each transition icon by default.
Can Evaluate Conditionally
If false the transition is never evaluated and can never be taken. This can be read/set in the transition blueprint graph. Turning this off prevents the BP graph from ever being executed and can be used if performance is a concern.
Can Eval with Start State
Allows this transition to be evaluated in the same tick as On State Begin. Requires Eval Transitions on Start set to true for the owning state.
How to Copy and Paste Transitions
- Copy the transition.
- Select two states in order of
FromtoTo. - Paste to connect the selected states with the pasted transition.
- Or select another transition and paste, adding the pasted transition to the connected states.
Reroute Nodes  
Reroute nodes are available to modify the shape of the transition path in the editor. This is to help organize graphs and has no impact at run-time. Functionally it is exactly the same as having a single transition between the states.
- Double click a transition to add a reroute node or drag out from a node and select
Add Reroute Node. - Changing a setting on any of the icons in a path changes the settings on the entire transition.
Named Transitions 
Transitions can be renamed similar to states through the details panel. The default behavior is to display renamed transitions on hover. This behavior can be changed under Project Settings -> Logic Driver Editor.